
Custom Resolution Utility (CRU) lets you make custom monitor resolutions and refresh rates beyond standard settings, improving gaming, viewing, and compatibility with precise adjustments for better display performance.
| File Name | Custom Resolution Utility (CRU) |
|---|---|
| File Size | 532 Kb |
| Version | 1.5.2 [Latest] |
| Developer | ToastyX |
| Last Update | Dec 04, 2023 |
- Introduction
- Understanding CRU
- Key features CRU
System Requirements
Installation and Setup
Considerations and Best Practices
- Conclusion
Custom Resolution Utility (CRU) is a powerful software tool designed for users seeking a comprehensive solution for their monitor’s display settings. Whether you’re a gamer aiming for smoother gameplay, a creative professional needing precise visual fidelity, or a tech enthusiast exploring the capabilities of your hardware, CRU is your one-stop solution, offering enhanced control beyond what standard configurations provide.
At its core, CRU enables users to create and manage custom resolutions, refresh rates, and timings tailored to specific needs. This functionality is particularly beneficial in scenarios where standard monitor settings do not meet the desired requirements, such as achieving higher refresh rates for reduced screen tearing in fast-paced gaming environments or optimizing display resolutions for detailed design work.
The utility lets users modify detailed parameters of their monitor’s display output. This includes defining resolutions that may exceed native capabilities, adjusting refresh rates to enhance fluidity and responsiveness, and fine-tuning timings to optimize compatibility with various hardware setups. By providing such granular control, CRU empowers users to unlock the full potential of their displays, whether for gaming immersion, professional productivity, or multimedia content creation.
One of the primary advantages of CRU is its ability to improve visual clarity and performance. Gamers can benefit from smoother gameplay experiences with reduced input lag and screen tearing, while designers and multimedia professionals can achieve sharper, more accurate visuals necessary for intricate editing tasks. This versatility makes CRU a valuable tool across industries where display quality and performance are critical factors.
Moreover, CRU supports a wide range of monitors and graphics cards, offering flexibility for users with diverse hardware configurations. Thanks to its user-friendly interface and comprehensive documentation that guides users through setup, configuration, and troubleshooting, it facilitates customization without requiring advanced technical knowledge.
Understanding CRU
Custom Resolution Utility (CRU) works by allowing users to manipulate detailed parameters of their monitor’s display settings beyond what is typically offered by default. Here’s a breakdown of how CRU operates and its core functionalities:
1. Custom Resolution Creation
CRU enables users to define custom resolutions that are not natively supported by their monitor or graphics card. This feature is particularly useful for achieving resolutions that are higher or different from standard presets. Users can specify the exact pixel dimensions (width and height) of the display, adjusting them to fit specific preferences or requirements.
2. Refresh Rate Adjustment
Beyond resolution, CRU allows for fine-tuning of refresh rates. Users can set refresh rates higher or lower than the standard options provided by their hardware. Increasing the refresh rate can result in smoother motion and reduced motion blur, which is beneficial for gaming and multimedia applications where fluid and responsive visuals are crucial.
3. Timing Tweaks
CRU provides tools to adjust timing parameters such as pixel clock, horizontal and vertical timings, and sync polarities. These tweaks help optimize display compatibility with various graphics cards and monitors, ensuring that custom resolutions and refresh rates are properly synchronized and displayed without issues.
4. EDID Management
CRU includes features for managing Extended Display Identification Data (EDID), which is essential for communication between the monitor and the graphics card. Users can override or edit the EDID to specify supported resolutions and capabilities, ensuring proper recognition and utilization of custom display settings by the operating system and applications.
5. Multiple Monitor Support
CRU supports configurations with multiple monitors, allowing users to apply custom resolutions and settings across all connected displays. This ensures consistency in display quality and performance across different monitors in a setup, accommodating complex display environments.
6. User Interface and Accessibility
Despite its advanced functionalities, CRU offers a straightforward user interface that facilitates ease of use. Users can navigate through various settings, apply changes, and save configurations with minimal technical expertise required. Comprehensive documentation and community support further aid users in understanding and utilizing CRU effectively.
7. Backup and Restore Options
CRU includes options for backing up and restoring custom display configurations. This feature is crucial for maintaining preferred settings across system upgrades, driver updates, or hardware changes, ensuring that users can revert to their customized display setups without difficulty.
Key features of Custom Resolution Utility (CRU)
Custom Resolution Creation: CRU allows users to define and implement custom resolutions for their monitors beyond standard presets. This capability is crucial for achieving display configurations tailored to individual preferences or application requirements.
Refresh Rate Adjustment: Users can adjust the refresh rate of their monitors, enabling smoother motion and reducing screen tearing, which is particularly beneficial for gaming and multimedia applications where the fluidity of visuals is essential.
Timing Tweaks: CRU provides tools to fine-tune timing parameters such as pixel clock, horizontal and vertical timings, and sync polarities. These adjustments help optimize display compatibility and performance across different hardware setups.
Detailed Control: The utility offers granular control over various display parameters, allowing users to modify resolutions, refresh rates, and timings with precision. This level of customization ensures optimal visual quality and responsiveness based on specific needs.
Compatibility with Multiple Monitors: CRU supports multiple monitors and graphics cards, making it versatile for users with complex display setups or multi-monitor configurations. It ensures consistency in customized settings across all connected displays.
User-Friendly Interface: Despite its advanced capabilities, CRU features an intuitive interface that simplifies creating and managing custom display settings. Users can easily navigate settings and apply adjustments without requiring extensive technical knowledge.
Documentation and Support: The utility is supported by comprehensive documentation and community forums where users can find guidance, troubleshooting tips, and updates. This ensures users can maximize the utility’s potential and address issues effectively.
Backup and Restore Options: CRU includes features for backing up custom display configurations. These allow users to restore settings in case of system changes or unexpected issues, ensuring continuity of preferred display setups.
Versatility and Application: Whether used for gaming, graphic design, video editing, or professional applications, CRU offers versatility in enhancing display performance and meeting specific visual requirements across different use cases and industries.
System Requirements
- Operating System: Windows Vista or later (Windows XP does not support EDID overrides)
- GPU: AMD/ATI or NVIDIA with the appropriate driver installed (Microsoft Basic Display Adapter driver does not support EDID overrides)
- Intel GPUs and laptops with switchable graphics require specific drivers:
- Newer Intel GPUs are supported with the latest drivers.
- 6th generation (Skylake): Intel Graphics Driver for Windows [15.45]
- 4th/5th generation (Haswell/Broadwell): Intel Graphics Driver for Windows [15.40]
- 4th generation (Haswell) for Windows 7/8.1: Intel Graphics Driver for Windows 7/8.1 [15.36]
- Older Intel GPUs are supported for external displays only using an alternative method described below.
Installation and Setup
- Download CRU:
- Visit the official CRU website or trusted software repositories to download the latest version of CRU.
- Ensure compatibility with your operating system (Windows) and hardware.
- Extract Files (if applicable):
- If CRU is downloaded as a compressed file, extract its contents to a convenient location on your computer.
- Launch CRU:
- Navigate to the folder where CRU is extracted or installed.
- Double-click on the CRU executable file (CRU.exe) to launch the utility.
Creating Custom Resolutions
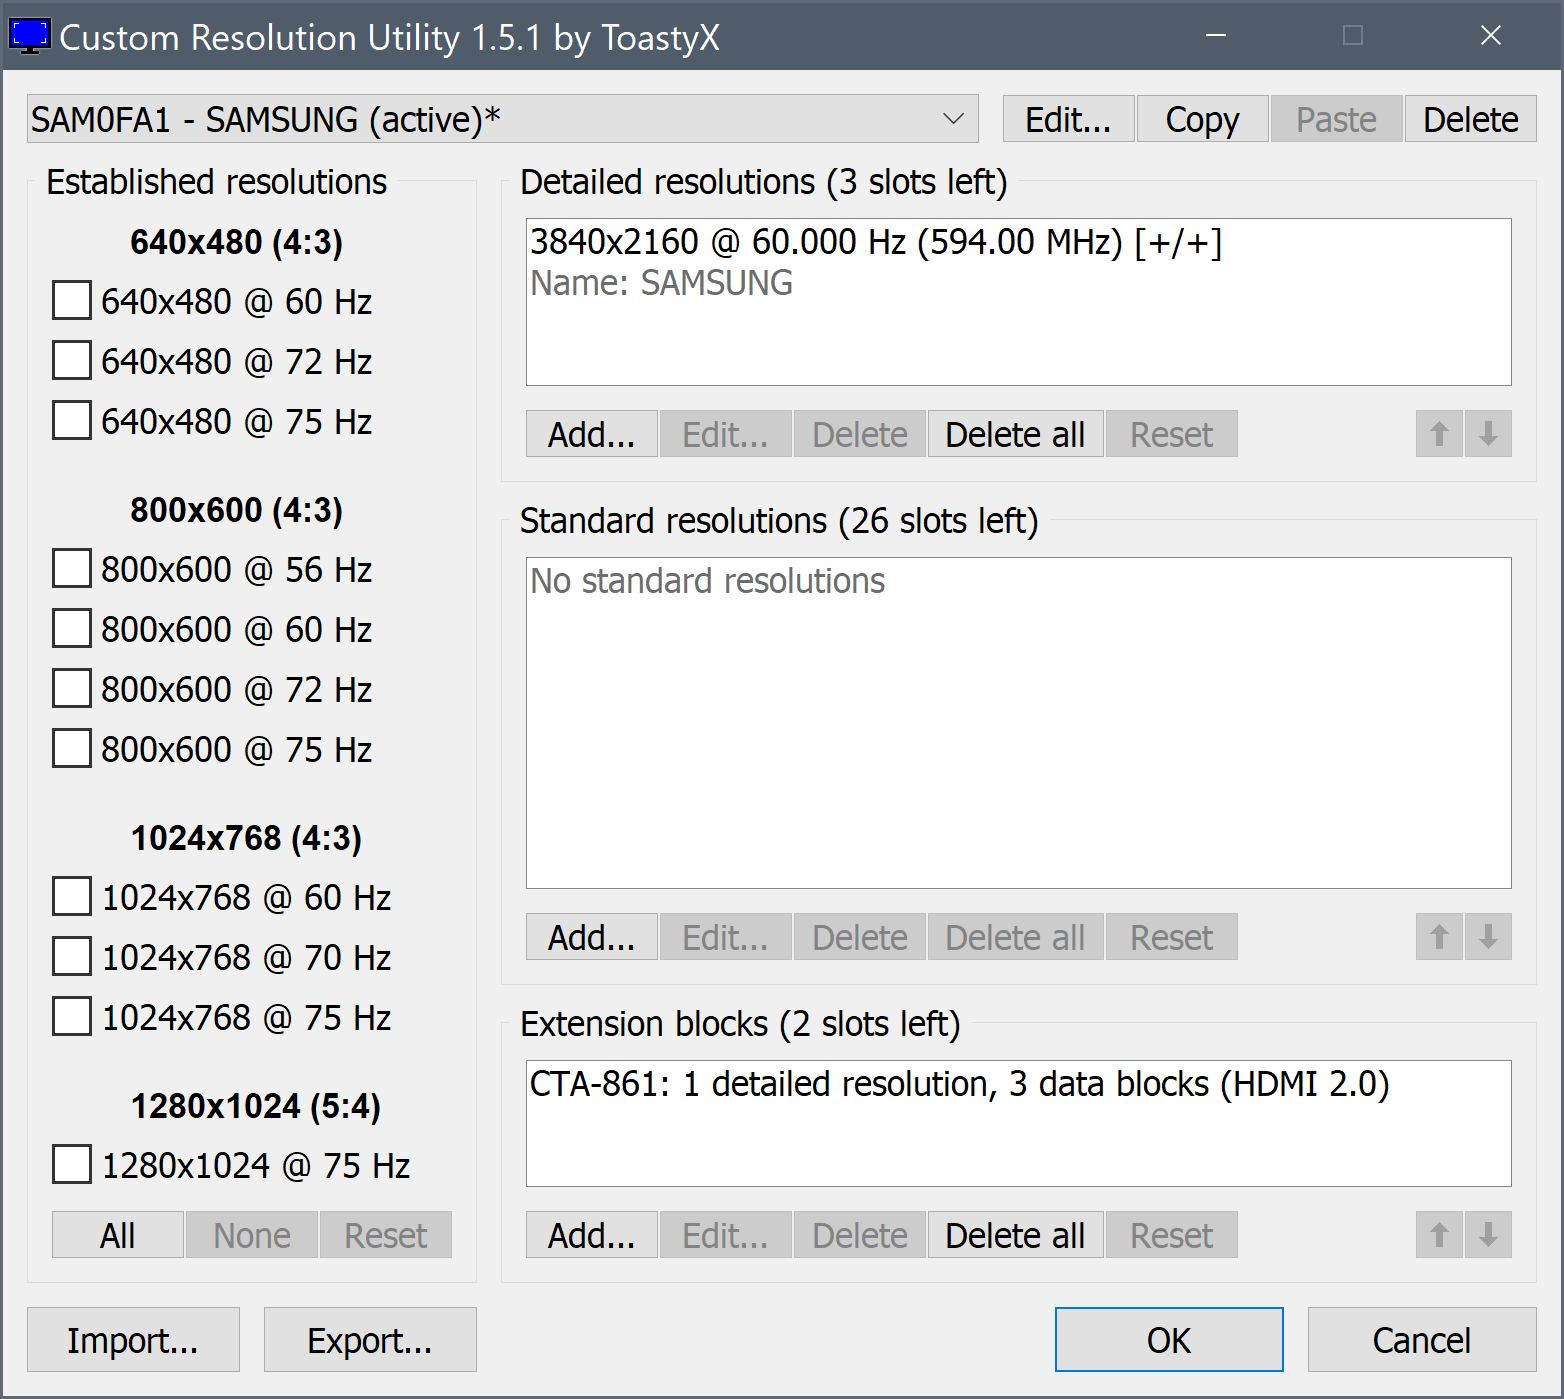
- Open CRU Interface:
- Once CRU is launched, the main interface displays your monitor’s details and current settings.
- Add a Custom Resolution:
- Click on the “Add” button under the Detailed Resolutions section.
- Enter your desired resolution width and height in pixels.
- Specify the refresh rate (if different from default) and other timing parameters as needed.
- Edit Detailed Resolutions (Optional):
- Select an existing detailed resolution and click “Edit” to modify the timing, sync polarity, and pixel clock parameters.
- Adjust settings based on your monitor’s capabilities and compatibility with your graphics card.
- Save Changes:
- After creating or editing resolutions, click the “OK” button to save your settings within CRU.
Adjusting Refresh Rates and Timings
- Navigate to Monitor Properties:
- Click on the “Detailed Resolutions” or “Standard Resolutions” tabs in the CRU interface.
- Select the resolution profile you wish to adjust.
- Modify Refresh Rates:
- Under the resolution profile, adjust the refresh rate settings using the dropdown menu.
- CRU allows you to set refresh rates higher or lower than standard presets to optimize display performance.
- Fine-tune Timings:
- Click on “Edit” next to the resolution profile to modify timing parameters such as pixel clock, horizontal and vertical timings, and sync polarity.
- These adjustments help ensure compatibility and stability of custom resolutions with your monitor and graphics card.
- Apply Changes:
- Once adjustments are made, click “OK” to apply changes and update your monitor’s settings.
Final Steps
- Restart Your Computer:
- For changes to take effect, restart your computer to allow the operating system to recognize and apply the new display settings configured through CRU.
Considerations and Best Practices
When using Custom Resolution Utility (CRU), it’s essential to consider several factors to ensure compatibility and mitigate risks associated with customizing monitor settings beyond standard configurations. Firstly, before applying any changes, verify that your monitor and graphics card support the resolutions and refresh rates you intend to set. Not all hardware combinations can accommodate extreme settings, so understanding your devices’ capabilities is crucial to avoid potential compatibility issues. Additionally, ensure your operating system, typically Windows, supports the adjustments made through CRU to prevent conflicts that could disrupt normal display functionality.
As with any tool that modifies hardware settings, CRU carries inherent risks if not used correctly. Incorrect settings can lead to serious issues such as screen flickering, black screens, or, in extreme cases, hardware damage. It’s recommended to start with conservative adjustments and gradually increase parameters while monitoring for stability. Extreme refresh rates or unsupported resolutions should be approached cautiously to prevent system instability or damage to your monitor.
If you encounter display problems after applying custom settings, restart your computer to reset display configurations. Utilize safe mode or recovery options if necessary to access your system and revert changes that prevent normal startup. CRU provides options to restore default settings or revert to previously saved configurations, which is particularly useful in troubleshooting scenarios. Regularly backing up your custom profiles ensures you can quickly restore settings that worked reliably before making adjustments, safeguarding against unforeseen issues caused by system updates or hardware changes.
Conclusion
Custom Resolution Utility (CRU) is a versatile tool for users seeking to customize their monitor’s display settings beyond standard configurations. By allowing users to create custom resolutions, adjust refresh rates, and fine-tune timings, CRU empowers individuals across various industries—from gamers aiming for smoother gameplay to multimedia professionals requiring precise visual clarity. The utility’s ability to enhance display performance and compatibility with multiple monitors underscores its value in optimizing user experience.
FAQ's
Custom Resolution Utility is a software tool that allows users to create custom resolutions, adjust refresh rates, and modify timing parameters for their monitors beyond standard presets.
Custom Resolution Utility offers more advanced customization options not typically available through monitor menus, such as creating resolutions and adjusting refresh rates beyond what the monitor natively supports.
Yes, Custom Resolution Utility is generally safe when used correctly. However, incorrect settings can potentially cause display issues. It’s essential to understand your hardware’s capabilities and follow best practices.
While Custom Resolution Utility itself doesn’t damage hardware, incorrect settings, especially very high refresh rates or unsupported resolutions, can lead to display issues. Use conservative settings and monitor for stability.
You can download Custom Resolution Utility from its official website or trusted software repositories. Installation involves extracting files from a compressed folder and launching the executable file.
Custom Resolution Utility supports most monitors and graphics cards, but compatibility may vary. Check your hardware specifications and update drivers to ensure optimal performance.
Yes, Custom Resolution Utility can create resolutions higher than your monitor’s native resolution, but ensure your hardware can handle it without compromising performance or risking damage.
Detailed resolutions in Custom Resolution Utility allow users to specify custom resolutions with specific timing parameters like pixel clock, horizontal and vertical timings, and sync polarities.
To add a custom resolution in Custom Resolution Utility, open the utility, go to the Detailed Resolutions section, click Add, enter your desired resolution and refresh rate, then click OK to apply.
Yes, Custom Resolution Utility allows users to adjust refresh rates, which is useful for achieving smoother motion and reducing screen tearing, especially in gaming and multimedia applications.
Setting a refresh rate too high can strain your hardware, potentially causing instability or damage. Start with moderate adjustments and monitor for any adverse effects.
Yes, Custom Resolution Utility is compatible with both AMD and NVIDIA graphics cards, providing flexibility for users across different hardware platforms.
To uninstall Custom Resolution Utility, simply delete the program files or folder from your computer. You may also use the uninstall option if provided during installation.
Yes, Custom Resolution Utility can be used to overclock monitors by increasing refresh rates beyond factory settings, though results may vary depending on monitor and hardware capabilities.
EDID (Extended Display Identification Data) in Custom Resolution Utility is data stored in monitors to communicate capabilities to the graphics card. Custom Resolution Utility allows editing and customization of EDID settings.
To edit EDID settings in Custom Resolution Utility, navigate to the EDID tab, import or edit existing EDID data, modify settings as needed, and save changes to apply them.
If your screen goes black after applying Custom Resolution Utility settings, restart your computer in safe mode, revert to default settings, or use system recovery options to restore stable display settings.
You can reset Custom Resolution Utility settings to default by deleting custom profiles, restoring backups of original settings, or reinstalling Custom Resolution Utility if necessary.
Yes, Custom Resolution Utility documentation and online forums provide troubleshooting guides for common issues like display artifacts, compatibility problems, and system crashes.
Yes, Custom Resolution Utility supports multiple monitors, allowing users to apply custom resolutions and settings across all connected displays for consistency and compatibility.
Yes, Custom Resolution Utility is compatible with Windows 10 and Windows 11 operating systems, providing support for modern hardware and software environments.
Creating custom resolutions with Custom Resolution Utility allows users to optimize display clarity, achieve higher resolutions for detailed work, and enhance gaming or multimedia experiences.
Yes, Custom Resolution Utility is commonly used to create custom resolutions and adjust refresh rates specifically for gaming to achieve smoother gameplay and reduce input lag.
You can backup Custom Resolution Utility profiles by exporting detailed resolutions and settings to a file, which can be imported later to restore configurations if needed.
Recommended settings for gaming with Custom Resolution Utility include adjusting refresh rates slightly above default settings to improve responsiveness and reduce motion blur.
Custom Resolution Utility’s support for HDR displays may vary. Ensure your monitor and graphics card support HDR, and check for updates or specific configurations for HDR compatibility.
Yes, you can revert changes made by Custom Resolution Utility by restoring backups of previous configurations, deleting custom profiles, or reinstalling default settings as needed.
To check if your custom resolution is working correctly, verify display settings in your operating system’s display options or use Custom Resolution Utility’s monitor validation features.
Using Custom Resolution Utility typically does not void monitor warranties, as it does not modify hardware components. However, check manufacturer policies regarding warranty and usage modifications.
For more information and support on Custom Resolution Utility, consult the official Custom Resolution Utility documentation, community forums, or online resources dedicated to display customization and troubleshooting.
Custom Resolution Utility - Monitor Optimization Guide
Download Custom Resolution Utility to add custom resolutions and refresh rates. Optimize your monitor's performance for a better display experience.
Price: Free
Price Currency: $
Operating System: Windows 7, 8, 10 and Windows 11
Application Category: Software
5